Welcome, future founders and hackathon heroes! If you’re searching for the ultimate guide to rapid product development, you’ve found it. Learning to prototype quickly is the ultimate superpower in the startup world and essential for conquering a 48-hour hackathon challenge. In this guide, we’ll break down Prototyping 101, giving you the workflow and tools to build a winning prototype / Minimum Viable Product (MVP) quickly.
What is Prototyping?
A prototype is an early sample, model, or release of a product built to test a concept or process. It is the simplified version of your final solution, built to test and validate assumptions quickly. A prototype is not the final product, it’s usually not polished, it can take many forms depending on the objective and problem this prototype aims to solve; it could be a mock up of a mobile app, a physical product using 3D printing, or a website.
Prototypes are generally categorized by their fidelity
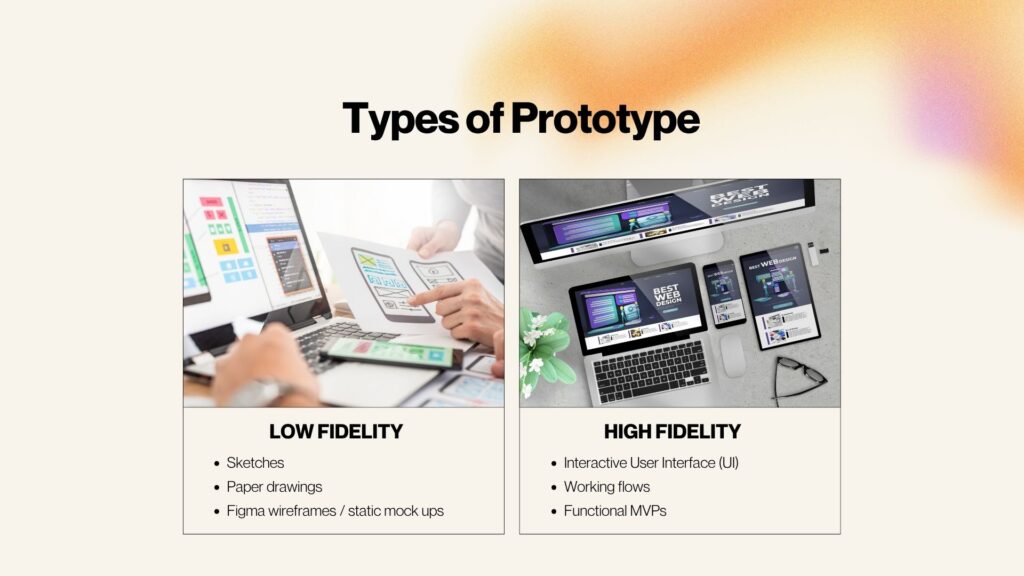
Low-fidelity (Low-Fi) prototypes focus on speed, clarity, and concept validation. They are quick, simple representations of an idea used to test layouts, user flows, and overall concepts before investing time in detailed design. Common examples include sketches (user journey, wireframes etc), paper drawings, or basic Figma wireframes.
High-fidelity (High-Fi) prototypes, on the other hand, focus on realism and functionality. These are more polished, refined and interactive mock ups or working prototypes often used to simulate real user experiences or demonstrate working flows. Examples include interactive UIs, clickable prototypes, or functional MVPs.
Prototype vs MVP vs Demo: Understanding the Stages
To succeed in a hackathon, you should know what you are building and why. These three stages serve distinct purposes:
- Prototype [Learn]: The prototype is a quick visual or clickable model used to test initial ideas and user flows. It helps you learn if your core concept makes sense.
- MVP (Minimum Viable Product) [Validate]: The MVP is a simple working version that shows one real feature in action. Its goal is to deliver the core value and validate whether your primary solution is viable.
- Demo [Showcase]: The Demo is a clear, concise walkthrough, ideally under 2 minutes. It is designed to convince judges by proving the problem, your solution, and its impact during the presentation.
🎯 The Prototyping Golden Rule:
If the judge can’t see it, don’t build it.
Choose what to build by identifying only ONE core feature that solves the main pain point and is demo-friendly.
From Broad Theme to Buildable Idea
Hackathons often start with a vague theme like “Sustainability” or “Future of Work.” Your first challenge is narrowing this down to a specific, demo-friendly problem.
Brainstorm with “How Might We…”
Instead of just “problems,” frame your ideas as opportunities. This is a classic Design Thinking technique to generate positive, actionable ideas.
- Bad: “Remote workers are lonely.”
- Good: “How might we help remote workers feel a sense of spontaneous connection?”
- Good: “How might we help junior developers ask ‘dumb’ questions without feeling embarrassed?”
The “One-User, One-Problem” Rule
You cannot solve “sustainability” in 48 hours. Get specific.
- Define One User: Not “everyone,” but “a busy college student.”
- Find One Problem: Not “food waste,” but “they don’t know which food in their fridge is expiring first.”
- Your Solution: A simple app that lets them scan a receipt and get push notifications for expiring food.
Run a 10-Minute Feasibility Check
Before you commit, ask these questions:
- Can we demo this visually? (A data-heavy backend is hard to demo).
- Does it require data we don’t have? (e.g., “a machine learning model trained on 10 million medical images” is not feasible).
- Can we build the “magic moment” with low/no-code tools, interactive mock up, or AI-assisted tools using vibe coding?
Hackathon Team Workflow: Roles & Syncing
Hackathons are a team effort, a great idea can fail due to poor collaboration. Define your responsibilities and strategy in the first hour.
Define Roles Quickly
Don’t worry about titles, worry about key roles & responsibilities. Every team needs:
- The Prototyper(s) / Builder(s): The person (or people) who will actually build the UI and connect the tools. They live in Figma, Glide, Webflow, Lovable etc.
- The Pitcher / Storyteller: The person responsible for the pitch deck and demo script. They must constantly check that the prototype matches the story they are telling.
- The Strategist / Researcher: The person who defines the user journey, researches competitors (quickly!), and keeps the team focused on the “One-User, One-Problem”.
Use a “Single Source of Truth”
Don’t let your user flow live in one person’s head. Use a collaborative tool like Figma, FigJam, or Miro as your central hub. You could also sketch it in a white board so everyone can refer to it. This is where you will map your user journey, create your wireframes, and identify key features so everyone can see them.
Set Sync Points
Agree to meet for 10-15 minutes every 3-4 hours as a checkpoint. Use these “stand-ups” to ask one question: “Is the prototype we’re building still telling the same story as the pitch deck? / any roadblocks / updating progress”.
The 5-Step Prototyping Process
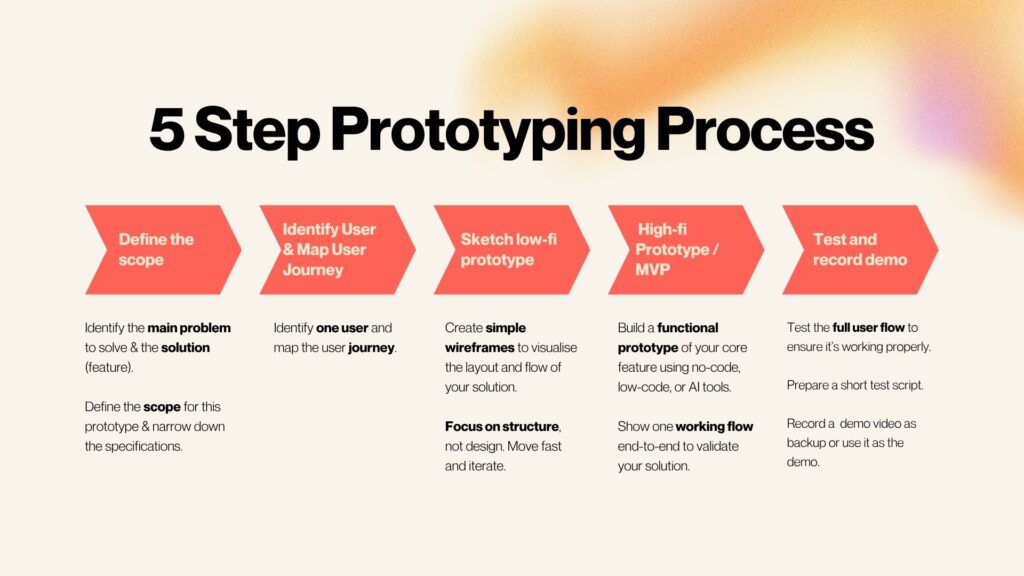
Follow this structured workflow to move efficiently from idea to functional prototype:
- Identify the Main Problem & Solution: Use the methods from Section 3 to define your One-User, One-Problem, and core feature. Define the scope. Narrow down specifications. What won’t you build? (e.g., “We will not build a login screen”).
- Map the User Journey: Define your target user and map their single, step-by-step user journey. This journey should be the exact story you tell in your demo.
- Sketch Low-Fi Prototype: Create simple wireframes (in Figma or on paper) to visualize the layout and flow. Focus on structure, not colors.
- Build High-Fi Prototype / MVP: Build a functional prototype of your core feature using no-code, low-code, or AI tools. Show one working flow end-to-end.
- Test and Record Demo: Test the full user flow thoroughly. Prepare a short test script and record a demo video to use as a backup or the actual presentation.
Vibe Coding
To accelerate your build process quickly, leverage AI-assisted tools through Vibe Coding.
What is Vibe Coding?
Vibe coding is an AI-assisted software development technique.Instead of manually writing all the code, the user describes their desired outcome in natural language, and the AI generates the corresponding code. You provide feedback, asking for changes or fixes until the generated output the “vibe” is exactly right.
The term “vibe coding” was coined by AI researcher Andrej Karpathy in early 2025.
How to Rapidly Build Prototypes through Vibe Coding
AI assisted tools can help you generate a prototype quickly, allowing developers and product team to focus on strategy rather than manual labor. Key AI-assisted tools for rapid prototyping includes:
- Lovable: Can build full apps from text prompts, potentially producing a working app within minutes.
- v0 from Vercel: Excellent for generating frontend UI code (React and Tailwind).
- Replit AI: Useful for fast backend scaffolds and code generation, often assisting with deployment.
- Other tools: Some low/no-code platform now offer Vibe Coding as well through prompting such as Hostinger AI Website Builder, Glide, and more.
Hackathon Strategy & Tips
Common Hackathon Traps to Avoid
Teams often fail due to these pitfalls:
- Trying to build too many features.
- Teams may overbuild the backend or select overly complex technology.
- Starting immediately with high-fidelity UI before confirming the flow.
- Not testing the demo flow early.
The Winning MVP Formula
To impress the judges, your prototype should adhere to these standards:
- Present a clear problem and real value.
- Demonstrate one primary user flow end-to-end.
- Show at least one real working component (e.g., functional screen, automation, or AI feature).
- Keep it simple, focused, and feasible within the constraints.
- Ensure the demo is smooth, clear, and under 2 minutes.
Time Boxing Strategy
Use a structured schedule to ensure you finish your prototype within 48 hours during a Hackathon.
| Time Block | Focus Area |
| Hour 0 to 8 | Brainstorm, define problem/solution, set up team , map user flow, and create sketches/Figma wireframes. |
| Hour 8 to 30 | Build the core product, backend, automations, and refine the UI/integrate AI features or link mock-ups to create the a prototype in figma |
| Hour 30 to 48 | Prepare the pitch deck, test the demo flow, polish, and rehearse the presentation. |
Fallback Demo Plan
Teams that freeze when their product crashes receive penalties by judges. Have a backup plan at all times.
- Record a screen capture of your working demo.
- Have screenshots prepared on your presentation slides.
- Keep a backup clickable flow in Figma ready to switch to.
- If it fails or there’s an error, just proceed and improvise.
By focusing on simplicity, leveraging no-code/AI tools, and managing your time effectively, you can build a compelling prototype and deliver a great demo! Have fun building.

Shannon Chow, the Head of Marketing at 1337 Ventures. With 10-years of experience in marketing and advertising, Shannon is a specialist in integrated marketing, no-code/low-code tools, UI/UX, and branding. She mentors entrepreneurs in pitching & marketing. She’s passionate about self-development and women’s empowerment, Shannon strives to simplify the knowledge of starting a startup and ignite the spirit of entrepreneurship among youths.